
|
|


Detailed Description, Tips, and Useful Links by Amanda Katz (SRAJD #1220) |
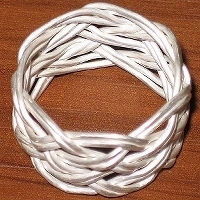
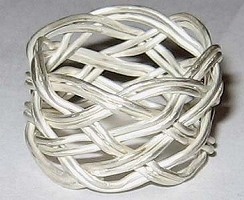
This is a supplementary article with information I had to search and find out on my own before I was able to successfully achieve a decent Turk's head knot in wire that I was proud to wear. The actual tutorial I used is here, but reading the information below will save you a lot of excess time! The Turk's head knot was inspired by metal working Turk's head knot guru Loren Damewood on Golden-Knots. First of all, practice makes perfect and it's better to learn how to do this knot in 1 mm leather a few times before diving straight into wire. The ring I created in the photo is 0.8 mm gauge sterling silver wire and was almost too thick for the double pass through. I have done the ring again in 0.8 mm fine silver wire and that was perfect. |
Please read through this section first before doing anything else: 1. Gauge of wire discussion. This 0.8 gauge was too thick in sterling silver, perfect in fine silver. Use 0.6 gauge maximum if you wish to do multiple pass-throughs. I found the 24 gauge (what's that, 0.4?) was too thin for a loose ring; that would need to be a really tight ring. 2. Ring size: These rings act like Chinese finger traps - if you open the lattice up the ring gets taller and thinner, if you squish it down it gets shorter and wider. If I were to anneal my ring I could potentially squish it down to 1 cm tall and a size 7, or M. I could open it up and make it smaller too. This is the good thing about these rings if you don't solder it all together - they are adjustable by plus or minus 1 ring size! 3. Mandrel versus ring size versus how much wire to cut? The 16 mm dowel mandrel gave me a size 6, or L ring that is 1.5 cm tall on my finger. The 19 mm dowel mandrel would give you a size 9, or like P, that would be 1.5 cm tall on the finger. On www.golden_knots.com there is a good page there that shows how to use geometry to figure out wire length to cut for what ring size. I cut 2 meters here for my ring on a 16 mm mandrel and ended up with half a meter left after the double pass. 4. Drilling holes spacing on mandrel: the further apart the two peg rows are, the more lacy and open your ring is going to be. This also means that a lacier, taller ring will adjust better to say plus 2 or even 3 ring sizes more. In a wire that stiffens up nicely, that's okay. But with fine silver or thin gauge wire you will find your ring bending out of shape, ring size a lot. 5. Number of passes: This is up to you. If you're going to do one pass only, use sterling silver or a wire that will be stiffened so that your final ring doesn't distort at the end. If doing multiple passes, like on rings on www.golden_knots.com (see below) then you will want to use fine silver and a thinner gauge. 5A. If you will be doing multiple passes around your mandrel, do not use tight tension on your first pass around the knot or this will warp how your second and third passes will sit nicely. Let it be a little loose so that on the second pass there is space above and below your pegs to lay the second row of wire nicely. My ring looks wonky a bit because I pulled way too tight the first pass around the knot (so my second row wants to sit parallel to my first pass, not snugly next to.) How to do the Knot: Get to know this knot first. The Turk's Head knot is fun and incredibly varied. I'm still trying to figure out the underlying over and under pattern but - aside that there are three resources I found INDISPENSABLE!!! First go visit and literally take in all the educational material freely available by Loren Damewood at Golden Knots . Mr. Damewood is the god of doing metal work and Turk's knots in my opinion. He gives a LOT of information on what makes up the knot, the terminology and is very free with showing different knots in string, a great way to practice in a cheap and easily manipulated medium. Read through all of his information so you can become knowledgeable about the knot structure and what's going on. Now how a Turk's head would transfer to wire. On YouTube, donbscout has done a fantastic series of 9 videos to teach you how to do a 7 bight, 6 lead Turk's head knot using his "recipe" book he is advertising here. It's great because it transfers directly to wire and tells you where you're supposed to go under and over and what pins to go to. However, while donbscout uses a square template jig, you need a round jig for a ring - do a trip to your local hardware store (gotta love them!) for 19 mm diameter wooden doweling and 16 mm wooden doweling and a 1.2 or 1.3 drill bit. Write down donbscout's instructions. Here is how you make your wooden dowel mandrel. (Please note the mandrel in this tutorial is a 5 bight, 9 lead ring. Remember to make 7 pegs on top and bottom of your round mandrel if using donbscout's instructions.) The idea is the holes you drill into the doweling needs to be the same size as the wire you have to stick in. I drilled my mandrel with a 1.2 bit and poked 1.25 (14 gauge?) copper wire cut to 1.5 cm long pegs, snug but can take the pegs out to release my finished ring. Now refer to M.A.I.L. (Maille Artisans International League) for an anonymous person's tutorial on actually doing a Turk's head ring in wire. This person has used the same number of pegs from donbscout's tutorial on youtube. You really will find a combination of referring to all three above resources helps set out understanding of how to do multiple passes through a knot rather than doing 3 separate wires at once. (To see Amanda Katz's website, please click here.) © Amanda Katz. No part or parts of this article may be used, copied, or distributed without prior written permission by the owner: Amanda Katz |
Turk's Head Knot Ring |